Thursday, September 30, 2010

pizza dough and other pizza tidbits


Trekking down a path like this to cook? How fun is that?! Funtastic!


I realize this looks like an out-of-control fire, but inside this oven, a test is underway to see if red bell peppers can be roasted while the oven gets up to temperature...The peppers get charred on all sides...then thrown in a paper bag to steam ... then the charred skin is peeled off. wow!! It worked!


I was reading about a pizza with grilled fresh corn, roasted red bell pepper, and smoked mozzarella. It sounded really good...and really unique! After getting a bit cocky with our roasted peppers, our humility was restored with our roasted corn...charred would be a better description. (: Below is a picture of the pizza with a few non-burned kernels. It was a fun new combination....I would top it with lots of parmesan, or a toss of sea salt...(more corn would have been good too!)


So, on to the dough recipe...

Being continually frustrated with dough that was too tough to stretch...then too fragile to stretch...

Being confused by all purpose flour... bread flour... King Arthur's 00 flour...

We took action, and googled Italian Caputo 00 flour. One would think that Italian flour would be readily available here....especially since Italy imports most of its wheat from North Dakota! (I am very proud of that, considering I was... well, still am... sort of... a ND wheat farmer) If you can make sense of that, you are good!
The site we found for the flour is www.brickovenbaker.com. This flour makes amazing dough.. it stretches easily without tearing, and has wonderful flavor and texture!

So, on to the dough recipe....again

4 cups Italian Caputo 00 flour
1 tsp salt
2 tsp yeast dissolved in 1/4 cup warm water
1 1/4 cup warm water

Mix together and knead for 7-8 minutes. Let rise about 2 hours until doubled in size.
Punch down.
At this point, we divide the dough into 5 pieces and put them in individual bowls....and if we are not going to use them for a few hours, we cover them with plastic wrap and put them in the refrigerator until an hour before pizza time!

Apparently you can freeze the dough in individual bags before the initial rising, then take the dough out of the freezer the morning of the pizza party to let it rise. We have not been able to try this yet .... it gets eaten as soon as it is made! If someone has tried this and knows the process, let us know!


Saturday, September 25, 2010

Apple Cinnamon Buttermilk Cake


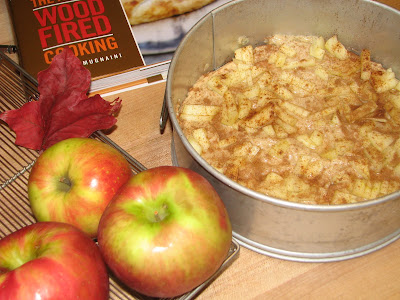
The cookbook in the corner of this picture has some helpful hints for cooking with a wood burning oven. I refer to it often! I guess that says something about my skills...or lack thereof. However, that is one of the things that makes this oven so much fun! You just never know what will happen. Luckily, it is usually not a total disaster. Just bring tin foil if the oven is too hot... bring wine if the oven is not hot enough (no, not to ignite the fire...) The other part that makes this oven so enjoyable, is the community that it builds. Such random fellowship...neighbors walking by... dogs eating the leftover pizza crust...spontaneous July 4th pizza party with visiting extended families....Sunday morning scones...Lake Superior trout packed in salt... Good stuff. Simple stuff.

The following Apple Cake recipe came from my favorite blog, Greens and Chocolate! It is delectably delicious! (Actually, I made three of them to give away! The oven stays hot a long time.... ) I have been on the watch for apple recipes, thinking we would have bushels and bushels of them from our fruitful(?) orchard. Rumor has it though, that Steve will have bees by spring and that should help with pollinating...and as an added perk, we will experience North Shore honey!


Apple Cinnamon Buttermilk Cake
from greensnchocolate.blogspot.com

1 cup flour
1/2 tsp baking powder
1/2 tsp baking soda
1/2 tsp cinnamon
1/4 tsp salt
4 T butter (1/2 stick)
2/3 cup sugar
1 tsp vanilla
1 large egg
1/2 cup buttermilk
1 cup chopped and peeled apple
1 heaping tablespoon sugar
extra cinnamon for sprinkling

Mix together dry ingredients and set aside.

Beat butter and sugar until fluffy.

Add egg and vanilla and continue beating.

Alternate adding buttermilk and flour mixture, ending with flour mixture.

Put in 9" cake pan (I used a spring form pan)

Sprinkle chopped apple over mixture.

Sprinkle with heaping tablespoon of sugar, and dust with cinnamon.

Bake at 400 degrees in conventional oven....the brick oven was approximately 450-500. The finished cake had a nice crisp topping, and the inside stayed remarkably moist. It took only 15 minutes (or so! Nothing is exact when dealing with a fire...) Very nummy...especially right out of the oven, but it was even good the next day!


Friday, September 24, 2010

Risotto with Roasted Butternut Squash and Bacon


Scott is on the shore today with his "hiking group". He really looks forward to these two days. They hike long and hard, and are trying to chip off the entire Superior Hiking Trail....two days a year. (: My dream would be to spend a week hiking to the oven and back with new food experiments in tow! Maybe I should organize an "eating group". Shouldn't be too tough to find...

With an entire weekend at home by myself, I decided to play with the woodburning oven in our backyard. For some reason, it is harder to make the commitment to use this one....other projects always get in the way. I saw this recipe on a blog yesterday, and remembered making a risotto dish in our oven class last fall. This was the day to try it!

Risotto with Roasted Butternut Squash and Bacon
adapted from The Art of Woodfired Kitchen and Guilty Kitchen.com


1/2 butternut squash, peeled
1 tsp fresh thyme
1 lb smoked bacon, thick sliced...cooked
1 pkg portabello mushrooms
3 T olive oil
1/2 cup chopped onions
2 cloves garlic
2 cups Arborio rice
6 cups chicken stock, heated
2 T unsalted butter
1/2 cup vermouth or dry white wine
1/2 cup freshly grated Parmigiano-Reggiano cheese

Dice squash into 1" cubes and place in sheet pan with fresh thyme. Drizzle with 1-2 T olive oil. With oven at "roasting temperature" (hearth approximately 550 degrees), roast squash about 6-8 minutes...do not fully cook at this point. It will complete cooking in the risotto.

Set heavy pan in the foreground of the oven with chopped onions and olive oil. Saute until softened....add garlic and roast a minute or two more. This can burn quickly so stay close.

Add mushrooms and saute until tender.

At this point, I transfered the onion, garlic and mushrooms to my bean pot because my saute pan was not big enough, but if you have a large one you can continue with that. Add rice, stir to coat with the oil, and cook about 3 minutes until lightly toasted and well heated.

Add hot stock to just cover the rice (about one cup). Stir, and then let sit in oven without stirring until liquid has been absorbed (about 5 minutes).

Repeat, allowing each addition of stock to absorb before adding the next.

After 15-20 minutes, add the squash mixture and wine and cook another 5 minutes or until rice is al dente.

Remove from oven and stir vigorously to increase creaminess. Stir in bacon, butter and cheese.

Garnish with truffle oil if you have some....more parmesan cheese of course...and freshly ground pepper!


Pretty good stuff! To keep the chicken stock hot, I would put it in a sauce pan and keep it at the front of the oven...

This was really fun and simple to make! It was such a gorgeous fall day here....and such a treat to be cooking outside. The hardest part for me.... splitting that wood! I found out later that two neighbors were chuckling as they watched me.... aim, focus, miss... I do appreciate that Bob always has perfectly split wood for our immediate use at the cabin oven. Thanks Bob!!

Wednesday, September 22, 2010

Fresh Peach Crisp


We got this recipe from a cooking class in Sonoma County last fall. The topping is chopped almonds, sugar, and butter. How could you go wrong with that?! Our mistake? (Do we always seem to have a mistake??!) The oven should have been about 450 degrees, but we were a bit rushed and slid the pans in the oven right after the pizzas were finished. The topping almost immediately started to burn. That oven was darn hot! A sheet of tin foil over the top solved it... the oven did its work...and it was darn good! It is amazing how adaptable food is in this oven. In a conventional oven, I wouldn't consider throwing an apple crisp in at 650 degrees. (:

Fresh Peach Crisp
from The Art of Woodfired Cooking by Andrea Mugnaini

2 cups whole almonds
1 stick unsalted butter, cut into 1" squares
1/2 cup packed brown sugar
1/4 cup flour

3 lbs ripe peaches (pears? or apples?) cut into 1" pieces
1/4 cup sugar
1/2 tsp cinnamon

Roughly chop almonds in food processor...or chop by hand if you are at a cabin without modern conveniences! (I have a tiny one that I got at Target for $5.99. It actually works pretty well...) Add butter, sugar, and flour until a crumbly mixture forms.

Toss peaches with sugar and cinnamon. Place in baking dish and top with 2 cups of topping. This recipe made much more than 2 cups of topping, so I refrigerated the extra, and ate it by the spoonful later. (I suppose I should not have admitted that....)
If using a ceramic dish, temper it at the mouth of the oven by turning it for about 3 minutes. Using cast iron will eliminate that step! Bake until peaches are heated through and the topping is beginning to brown, about 20 minutes.

If using apples, increase sugar to 1/2 cup and throw in a little nutmeg! Bake for 30 minutes.

Of course, you can use your favorite apple crisp recipe too! It works well after a pizza party. While eating the pizza, throw the dessert in the oven, and 20 minutes later.....ta da! A warm wonderful dessert!


Wednesday, September 15, 2010

Pizza!


Our goal last weekend was to use our homegrown ingredients from the shore. We were hoping to use the Worden grapes from our orchard in a new pizza combination, but alas....they were not ripe enough! Thanks to the North Shore Market and their abundant (?) supply of grapes, we were able to continue with our pizza plan, and combined the grapes with brie cheese, pine nuts and parmesan cheese. The result was terrific! I loved the sweetness of the grapes with the brie. As an added bonus, the grapes stayed slightly crunchy because of the quick 2-3 minute baking time. The oven temperature was 690 degrees, so dough did an immediate "spring" ... crispy light dough, crunchy grapes, and creamy brie.... ahhh! On top of that, it was a beautiful fall day!


Our next "orchard pizza" involved the Summercrisp pears....and although they were not quite ripe either...


...we sliced them very thin, and layered the pears with blue cheese, walnuts, and freshly grated parmesan cheese. It was declared a keeper by our visiting taste testers! We got the idea for adding nuts from Bill at www.woodfiredpizza.org. The nuts add a whole new dimension to the pizza, and we loved it! (If you decide to check out Bill's blog, also take a look at Don's blog...www.woodfiredkitchen.com. These guys have been really helpful...)


The honey crisp apples should have been ripe this week, but for some reason those trees did not even blossom this spring....!! ): Hopefully next year the neighborhood orchard will produce more abundantly and we will be making apple pizza, apple cake, and apple scones in the brick oven!